Showing posts with label vendor. Show all posts

December 26, 2018

#MeettheMakerWeek 2018

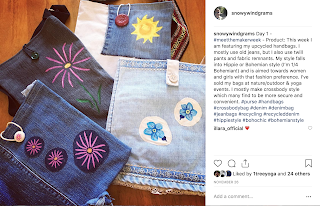
picture of several handmade denim purses

During the week after Thanksgiving, I participated in the Instagram challenge #MeettheMakerWeek.  This challenge is coordinated by artist and small business owner, Joanne Hawker.  You can learn more about Joanne at her website and on Instagram. 

This is the second year I've participated in this week-long challenge.  I have also participated in the month-long challenge #MarchMeettheMaker.  Instagram is my favorite social media medium.  I enjoy being able to share pictures of what I'm making.  Additionally, I have always loved taking pictures of nature (trees, flowers, water) and I find Instagram to be ideal for sharing those images.  Lastly, I include a weekly pic and Insta-stories of my dog, Jules.  I can be found at @snowywindgrams.  For this blog post, I'm sharing my pictures, with the post, from #MeettheMakerWeek.  


~Thank you!


*All photos taken and owned by me 

August 15, 2017

Paw Print Clothespin Magnet DIY

Of the many household tools, one that is starting to go obsolete is the clothespin.  Not as many people hang wet clothes outside to dry on a clothesline anymore.  So what can you do with that basket full of clothespins just sitting in the laundry room?  Clothespins are finding new life with other purposes like a chip-clip or to hold papers on the fridge.


In this blog post, I will be providing you with instructions to DIY your own clothespin magnets. I was inspired to make these by one of my favorite Etsy shops: Sugar and Paint. The style I am making today is pet inspired; paw prints!  I am looking forward to featuring these at my Snowywinds Booth on August 26 at Dog’s Day in the Park.

Supplies:

Clothespins
Acrylic paint
Acrylic varnish
Paintbrushes and paint-sponge
Paint pallet
Wax paper
Round magnets
Hot glue gun


Step 1:
Make sure the clothespins are clean. Separate the spring from the two wood pieces. Make sure to keep the springs lined up with their wooden pieces. Early on I forgot to do this; when I went to put the clothespins back together they didn’t all line up correctly! :(


Step 2:
Paint the solid color. I use wax paper to prevent newsprint from sticking or transferring to the clothespin. *Depending on the age of the clothespins, you may want to apply a multi purpose sealer prior to painting the solid color.


Step 3:
Paint your design on the wooden piece you have chosen to be the front. To make a paw print, paint an upside-down heart, round off the top point, and add four toes. *Remember, dogs & cats have 4 toes!
          

Step 4:
Coat each wood piece with a clear varnish. Let sit overnight. This is important.  You do not want the varnish to be tacky when putting the clothespin pieces back together. If so, the mouth of the clothespin will stick shut.

Step 5:
Get the hot glue gun warming up. Assemble the clothespins making sure to use the correct spring for each wooden set. Using the hot glue gun, attach the magnet to the back of the clothespin about level with the spring. Remove any glue strings.  And voila! You have your clothespin magnet!


*All photos taken by myself

June 17, 2017

Summer 2017!

School is out for summer!  Let Summer 2017 begin! 


This past Saturday was the kick-off event for Snowywinds Studios’ Summer 2017 event season. I was all set up at Sonnewald Natural Foods and magnets were the hot item. Currently, there are three events scheduled with the possibility of two more to be added.


When I was a kid, my parents would drag my brother and myself to all kinds of “-- In the Park” events around Maryland and Pennsylvania.  I would always appreciate the handmade products for sale.  Even in my teen angst phase, I still appreciated these artists creations. Deep down, I knew I wanted to do that one day with my own art.  Art was always my favorite class in school and making crafts was my favorite aspect of scouting (tied with hiking in the woods.)  In 2015, I finally took the leap and began doing in-person events with my very own maker business, Snowywinds Studios.

Entering the world of vendor events has definitely been a learning process.  I love the personal contact of art & craft shows, festivals, and flea markets.  My customers can actually hold my creations, try my bags on, and learn what makes me passionate about creating.  Participating in events has also been valuable in networking with other sellers within my community.  Last, I learned so much about branding and merchandising, which is an art in itself.  

When it comes to in-person events, I am still trying to find my niche.  My products are made from repurposed materials and I’m Earth conscious (The 3 R's = Reduce, Reuse, Recycle! Check out this Explore.org video with Jack Johnson!).  Nature themes abound in my art; flowers, mushrooms, butterflies.  My love of pets also finds its way into my art.  The three events I have lined up so far include yoga, dogs, and flea marketing.  


Before I go, I want to give a shout out to the Etsy Team Craft Fairs... it's a living! for all the advice and anecdotes shared in the discussion feeds.

Feel free to comment, contact me, &/or visit my Facebook page!
~Stacey