Showing posts with label Etsy shop. Show all posts

June 20, 2019

Creating with Canva


I was first introduced to Canva through an Etsy blog.  I was looking for a digital tool to assist me in making a new, professional looking banner for my Etsy shop. I also wanted to be able to set that banner at the proper dimensions for Facebook and my website as well. I was so pleased to see that Canva had formatting options in a variety of social media format sizes. Here is the first banner that I created (still a little clunky) and here is my newest banner.
 
 Snowywinds Etsy Shop

During most of the year, I am a high school Social Studies teacher. When it came time to teach a unit on the American culture of the 1950s, my mind started to think of ways I could have my students make a creative presentation. What digital tool could my students use to accomplish this task while also advancing my students’ technical skills? That’s when I recalled Canva! Canva is a graphic-design tool website.  Canva utilizes a drag-and-drop format with access to millions of images, graphics, and fonts.  After exploring Canva more, I learned that in addition to social media and website banner templates, it also has templates for brochures, posters, and, resumes to name a few.

                       music in the 1950s project                         

Through a combination of working on my Masters in Educational Technology and working on my crafting brand, I’ve continued to master Canva. I have used both the web application and the mobile app.  The mobile app is useful for creating collages from photos and directly sharing to Instagram (which still only allows uploads from mobile devices.) The main advantage of the web app is the larger screen size, but that larger screen also allows for more design icons to be viewed at once compared to the mobile app.
Screenshot of the mobile version
Screenshot of the web version
In conclusion, here are a few of my Canva projects...

Just this week, I created this Instagram post:

Here is an event post I created last year:

And here is a project for my grad class that I can also use to introduce myself to my new students in August:


February 12, 2019

Painting on Slate

My interest in painting slate goes back to when I was a kid in Girl Scouts.  Actually, a big chunk of my love of crafting, as well as my love of the outdoors, comes from my experience in Girl Scouts.  I first joined Scouts in first grade and I continued into college, at that point being the adult leading workshops for younger girls.  

painting of dragonfly and lotus flowerAbout five years after graduating college, I was redoing the yard of the house I was living in at the time, and I remembered that my parents had a stack of old slate shingles in their shed from past Girl Scout folk art projects. I used some of that slate to create stepping stones for the garden and painted some ivy designs on them.  It was then that I decided to once again recycle the slate shingle for hand-painted art. Instead of traditional ‘folk art’ designs, I chose to paint in my own style; colorful butterflies, flowers, & garden designs.

The design for each piece of miniature art is determined by the shape of the slate.  Larger pieces become wall-hangings featuring flowers or winter scenes. Smaller pieces become novelty magnets, little pieces of fridge art. Most recently I completed a series of four slate magnets.  The largest is roughly 2" x 1.5". The smallest is about the size of a quarter. Below is the series of steps of my slate painting.

After washing & drying, each slate gets a solid color background.

Some ideas come quicker than others...

or I get in a certain creative flow.

I use images of real butterflies when painting. 
Currently, slate magnets are for sale in my Etsy shop Snowywinds Studios.
Wall-hangings are currently only available at in-person events.  
Sign up for my email list to get notifications of events.

Until next time,
~Stacey

*All photos taken and owned by me 


December 26, 2018

#MeettheMakerWeek 2018

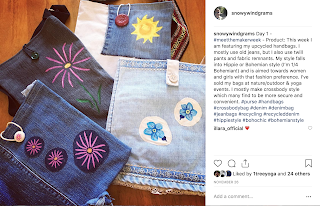
picture of several handmade denim purses

During the week after Thanksgiving, I participated in the Instagram challenge #MeettheMakerWeek.  This challenge is coordinated by artist and small business owner, Joanne Hawker.  You can learn more about Joanne at her website and on Instagram. 

This is the second year I've participated in this week-long challenge.  I have also participated in the month-long challenge #MarchMeettheMaker.  Instagram is my favorite social media medium.  I enjoy being able to share pictures of what I'm making.  Additionally, I have always loved taking pictures of nature (trees, flowers, water) and I find Instagram to be ideal for sharing those images.  Lastly, I include a weekly pic and Insta-stories of my dog, Jules.  I can be found at @snowywindgrams.  For this blog post, I'm sharing my pictures, with the post, from #MeettheMakerWeek.  


~Thank you!


*All photos taken and owned by me 

November 18, 2017

Holiday Gift Guide by Snowywinds


This time of year finds me busy painting; snowmen and evergreen trees, candy canes, and stockings.  Then, there is the pair of jeans I am hand painting for my 8 year old niece; a hippie style flower.  I love being able to share my art.  Ever since high school, I have given handmade &/or hand painted gifts to family and friends; framed prints, Christmas tree ornaments, original t-shirts.  


It can often be difficult coming up with the perfect gift.  There are your parents who have everything, the office Secret Santa with a $10 spending limit, and the fashionista who always has a cool bag.  To share the variety of gift items I make, I have put together a 2017 Holiday Gift Guide by Snowywinds.  

August 15, 2017

Paw Print Clothespin Magnet DIY

Of the many household tools, one that is starting to go obsolete is the clothespin.  Not as many people hang wet clothes outside to dry on a clothesline anymore.  So what can you do with that basket full of clothespins just sitting in the laundry room?  Clothespins are finding new life with other purposes like a chip-clip or to hold papers on the fridge.


In this blog post, I will be providing you with instructions to DIY your own clothespin magnets. I was inspired to make these by one of my favorite Etsy shops: Sugar and Paint. The style I am making today is pet inspired; paw prints!  I am looking forward to featuring these at my Snowywinds Booth on August 26 at Dog’s Day in the Park.

Supplies:

Clothespins
Acrylic paint
Acrylic varnish
Paintbrushes and paint-sponge
Paint pallet
Wax paper
Round magnets
Hot glue gun


Step 1:
Make sure the clothespins are clean. Separate the spring from the two wood pieces. Make sure to keep the springs lined up with their wooden pieces. Early on I forgot to do this; when I went to put the clothespins back together they didn’t all line up correctly! :(


Step 2:
Paint the solid color. I use wax paper to prevent newsprint from sticking or transferring to the clothespin. *Depending on the age of the clothespins, you may want to apply a multi purpose sealer prior to painting the solid color.


Step 3:
Paint your design on the wooden piece you have chosen to be the front. To make a paw print, paint an upside-down heart, round off the top point, and add four toes. *Remember, dogs & cats have 4 toes!
          

Step 4:
Coat each wood piece with a clear varnish. Let sit overnight. This is important.  You do not want the varnish to be tacky when putting the clothespin pieces back together. If so, the mouth of the clothespin will stick shut.

Step 5:
Get the hot glue gun warming up. Assemble the clothespins making sure to use the correct spring for each wooden set. Using the hot glue gun, attach the magnet to the back of the clothespin about level with the spring. Remove any glue strings.  And voila! You have your clothespin magnet!


*All photos taken by myself

August 1, 2017

My Hippie Style


Flash back to my middle school years, a period of tying to discover and establish my self-identity. I found myself gravitating to the music of the late sixties, early seventies; the Doors, Led Zeppelin, Janis Joplin. On the TV show The Wonder Years, Kevin’s older sister was my favorite character. I loved the fashion styles of that period, so I started wearing tie-die and my Mom’s old “vintage” clothing. When low cut, bell-bottom jeans came back in style in the early 1990s, I had to have them. I would wear flowers in my hair and round “John Lennon” sunglasses. Peace signs were everywhere, including my Cold War poster hanging in my room. This was my style.
 
In high school, I began painting things in my newfound hippie style. My wooden desk chair was painted with multihued peace signs, paisley, and organic swirls. Then I started on my jeans: roses, the happy face, and more peace signs. I also painted some T-shirts for friends and myself. When the jeans wore out, I cut the painted part off and pinned them up on my cork-board. I didn’t know what I was going to do with these remnants, but I knew I wasn’t finished with them!


In the early 2000s I got my own sewing machine. I was very excited to try it out and start sewing. As my creative mind began to spin, the idea of making a purse from recycled fabric came to me. I had a pair of super comfy khaki pants that wore out beyond wear-ability. I cut the material into two panels. Then machine embroidered one of my jean pieces (rainbow peace sign) onto the top panel. I picked up some really cool fabric ribbon at Joann Fabric that reminded me of my Uncle’s camera strap. The ribbon is primarily black with bold colors; red, yellow, & green. While I have needed to make new bags for myself, the strap has been reused for the third time and has lasted 15 years.

Bag #2
I received (and still receive) a lot of compliments on my bag. Women asked if I made bags with other designs, like dragonflies, painted on them. This got me thinking… I started with a dragonfly bag. This bag was not only hand painted, but also had hand embroidery. I would sit outside in the evening and embroider. From there I moved on to my painted daisy bag, machine embroidery, and other repurposed fabrics like olive cargo pants and fabric samples. As I create and sew, it is my goal to encapsulate that 60s-70s hippie look in my bags.

 
www.etsy.com/listing/114780400
www.etsy.com/listing/240854402
www.etsy.com/listing/24075   

June 17, 2017

Summer 2017!

School is out for summer!  Let Summer 2017 begin! 


This past Saturday was the kick-off event for Snowywinds Studios’ Summer 2017 event season. I was all set up at Sonnewald Natural Foods and magnets were the hot item. Currently, there are three events scheduled with the possibility of two more to be added.


When I was a kid, my parents would drag my brother and myself to all kinds of “-- In the Park” events around Maryland and Pennsylvania.  I would always appreciate the handmade products for sale.  Even in my teen angst phase, I still appreciated these artists creations. Deep down, I knew I wanted to do that one day with my own art.  Art was always my favorite class in school and making crafts was my favorite aspect of scouting (tied with hiking in the woods.)  In 2015, I finally took the leap and began doing in-person events with my very own maker business, Snowywinds Studios.

Entering the world of vendor events has definitely been a learning process.  I love the personal contact of art & craft shows, festivals, and flea markets.  My customers can actually hold my creations, try my bags on, and learn what makes me passionate about creating.  Participating in events has also been valuable in networking with other sellers within my community.  Last, I learned so much about branding and merchandising, which is an art in itself.  

When it comes to in-person events, I am still trying to find my niche.  My products are made from repurposed materials and I’m Earth conscious (The 3 R's = Reduce, Reuse, Recycle! Check out this Explore.org video with Jack Johnson!).  Nature themes abound in my art; flowers, mushrooms, butterflies.  My love of pets also finds its way into my art.  The three events I have lined up so far include yoga, dogs, and flea marketing.  


Before I go, I want to give a shout out to the Etsy Team Craft Fairs... it's a living! for all the advice and anecdotes shared in the discussion feeds.

Feel free to comment, contact me, &/or visit my Facebook page!
~Stacey


May 13, 2017

My Etsy Shop

SnowywindsStudios


I began my Etsy shop in 2011. It doesn’t seem like that long ago. I had less than 20 listings, but it was finally time to go for it. I kept at it, gradually adding more pieces and improving my listings. The next year I finally had 2 sales!
www.etsy.com
Today my shop has just over 50 listings with a goal of reaching 100 listings by September.  My listings fall into two main categories; handmade handbags and hand-painted gifts.  Both reflect my hippie style and unique artistic style.  I enjoy painting with bright colors.  Two of my favorite artists are Frank Stella and Henri Matisse, both known for their use of bright colors.  I was very fortunate to be exposed to modern art at a young age, having visited the Smithsonian Institute in Washington DC.  I also had two fantastic art teachers in high school who found it essential to take their students to prominent art museums to witness the work of the masters.
www.flickr.com/photos/clairity/24349455803

The perfectionist in me always strives for realism in my art, but yet I can not avoid modern impressionism.  Following after my grandfather, Frank Winter, I use photographs to draw and paint from. After conceptualizing the design in my head and sketching my idea, I turn to photographs to get the detail, color, and proportion.  Even when using ‘unrealistic’ colors, for example pink mushrooms, I still seek to get my proportion and shading correct.


Snowywinds Studios on Etsy allows me to share my creations.  Today, I find myself painting on recycled slate shingles, seashells, and fabrics.  My in-person events also include hand painted bricks, river rocks, and clothespins.  Nine months of the year I am a school teacher.  As summer break approaches, I look forward to getting more ideas from my head to the paint brush.  My artistic journey can be followed more closely on Instagram: @snowywindgrams


“I paint flowers so they will not die” ~Frida Kahlo